
I winter sowed my seeds in a milk jug on March 5 and in a flat on March 6. It's getting toward the end of the winter sowing season here in southeastern Michigan, but nasturtiums don't require extended periods of cold to bloom, so it's all good.
Sowing in a milk jug went a little something like this:
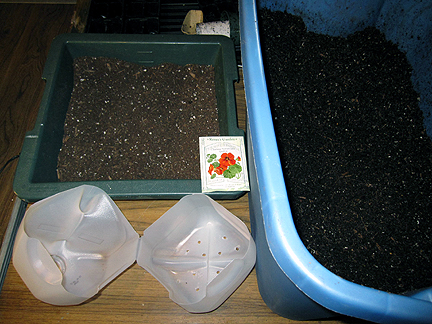 I gathered my materials: lots of well-moistened soil mix (blue tub), a little bit of dry soil mix (green tub), the seeds, a milk jug with holes drilled in the bottom and cut around all but an inch of the jug. The soil mix has to be a mix; topsoil is too heavy, seed starting mix is too light. I use Miracle-Gro Potting Mix. Also note: Do not buy mixes with weed suppressants (they also suppress the very seeds you want to grow) and moisture crystals (too moist for winter sowing, great for container gardens).
 ...and pre-soaked peat pots. Peat dries out really quickly (especially if it also has bottom holes, which I have no idea why they bothered!).
 I drilled 12 holes in the bottom of the jug (three per quarter section). I did this before cutting the jug so it's more stable and easier to drill into. The top of the jug already has a hole, so you don't need to drill into it. Keep the lids off, as snow and rain have to get in!
 I cut about five inches up the jug, all the way around the jug except leaving about one inch attached so the lid can be pulled back without coming off. The attached piece can be anywhere on the jug except on the handle, which makes it harder to bend back.
 I pulled back the top half of the jug and filled the bottom with the wet peat pots. I then filled the pots almost all the way to the top with the soil mix. I read the instructions on the nicely illustrated seed packet (as a former technical writer, I simply can't not read instructions) and found the seeds should be planted an inch deep. I marked an inch (orange line) on a pen and used this to create one hole in each of the pots. You can plant more per pot, or other subcontainer, if you want to.
 I then dropped a seed into each of the holes. Next I spooned some of the dry soil mix (the moist mix is too hard to spread evenly or into small spaces) into the holes on top of the seeds, and then I spread a thin layer of the dry soil mix on top of everything.
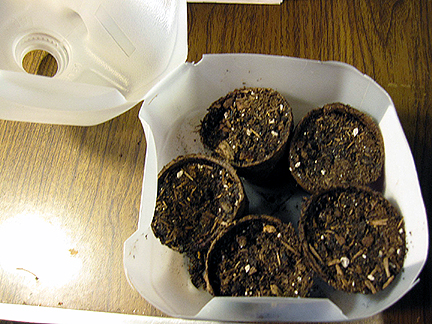 I then used a spray bottle to moisten the top layer. Everything is ready to close the lid now.
 I closed the top half of the jug and then used the handyman's secret weapon, duct tape, to seal the cut. Notice I pressed the tape in tight along the circular indentations of the jug. It's important to do this, instead of pulling the tape taught across, which leaves air gaps and dries out the soil mix.
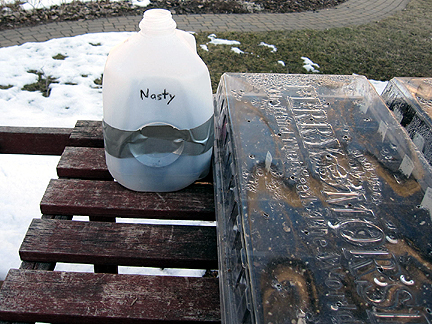 I labeled the jug with a grease pencil, which will not wear off in the weather. Because the subcontainers all have the same seeds, I did not label them individually, only the jug as a whole. I then set the jug outside next to two flats I sowed back in January. Notice the precipitation on the lid. That indicates the moisture is okey dokey.
I sowed some more of the nasturtiums into cell packs inside a flat, using the same moist and dry soil mixes:
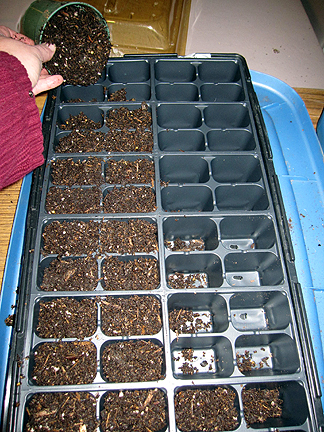 In a flat, I like to use cell packs instead of peat pots as the subcontainers. They come with slits in the bottom, so I don't have to drill any holes in them. I did drill holes into the top of the clear dome lid and into the bottom of the black tray.
The peat pots are easy to fill using a spoon. but I use a bigger scoop for the cell packs, because all the cells are connected. I gently push my fingers into each cell to make sure each is properly full. But don't push down hard as you don't want to compact the soil.
When that was done, I used the pen the exact same way as before to make the holes and drop the seeds in.
Because there are other seeds in this flat as well, I made a labels. I like to use cut-up old mini-blinds, with pencil or grease pencil. It gets very moist in the containers and that's the only combination of label/writing tool that I've found works.
 Here you can see the planted flat with most of the labels in place. A feline helper is optional for you, but pretty necessary for me. (Actually, James was just passing through. Neither he nor Fiona disturbs seedlings or potted plants. I know! They're just not members of the International Cats Union!)
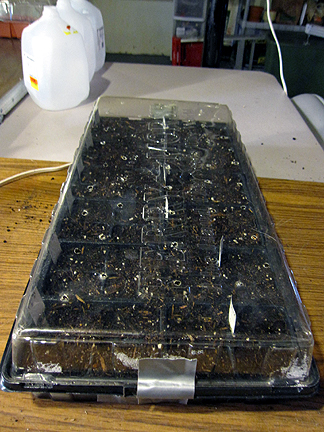 I again used the handyman's secret weapon, duct tape, to secure the two short ends of the flat, and then set the flat outside.
Now I wait, just checking moisture and watering if the soil mix gets dried out.
This is not the first time I've winter sown nasturtiums. I used to grow them when I stewarded the Cobblestone Farm Fountain garden. Click here to see seedlings from April, 2008 (yep, they sprout early!).
Gotta love that duct tape. Good luck with the nasturtiums.
ReplyDeleteYour operation looks grand. I did another bit of sowing the other day. Sweet Peas. I want that fragrance going in the garden. I know it is early but i am chomping at the bit.
ReplyDeleteIt looks easy to do and I am am glad I bought the easy to read and follow instructions in Fun With Winter Sowing! Gail Have a good day!
ReplyDeleteI need to get going on my Spitfire seeds. It's almost mid March and it would be nice to have something to show for the first Sunday in April. I like the idea of using the peat pots inside of the milk jug. It looks like it will be much easier to transplant later!
ReplyDeleteDuck tape and nasturtiums, good stuff! I should be following your advice since I end up buying baskets of nasturtiums ... very pricey!
ReplyDeleteI can see why you were such a successful technical writer, Monica. My milk jugs are sitting outside right now and look just like yours, thanks to all the excellent instructions in your book. Next year I'll have to try nasturtiums!
ReplyDeleteGood morning Monica. Thank you for that wonderfully detailed description. I still have a few more things to winter sow--I cannot walk past a seed display rack without packets leaping into my cart:)
ReplyDeleteMarnie
Good morning Monica. Thank you for that wonderfully detailed description. I still have a few more things to winter sow--I cannot walk past a seed display rack without packets leaping into my cart:)
ReplyDeleteMarnie
Great info, Monica, thanks for sharing. I would love to try this method--hey, anything that uses duct tape & recycled milk jugs has my vote! Loved the feline streak of fun in the background too. Isn't that just like a cat? Always looking for a photo-op!
ReplyDeleteI use Miracle Gro potting mix most of the time too. Unforunately nasturiums really do tend to look nasty here -- it often gets too hot too early for them to have much of a season. Good luck with yours, I bet they like it where you are!
ReplyDeleteMonica, love your details and I am marking this post to use next year! I was too lasy this year and din't get any winter sowing done. I know your seeds are very appreciative of your care and expertize. They will give you lots of great plants.
ReplyDeleteHey me too! I wintersowed some of my GROW seeds March 4th, I'm starting some indoors soon and will direct sow more later.
ReplyDeleteWow! That's so professional! I usually figure whatever doesn't make it outside in a pot doesn't deserve to live... Well California will do that to you.
ReplyDeleteNasty, nasty seeds... now there's an 80s song for you!
ReplyDeleteI've never winter-sown but between you and Kylee, I feel like I have enough info to try it. Maybe I'll try half of my nasturtium seeds this weekend and then do the rest after May 15 and see what happens!
P.S. It was great to see you yesterday!
Will you please send James and Fiona to my house to talk to my two fur balls? I so wish my little toots did not belong to the cat union. They are due paying members for sure with their plant nibbling. I picked up some “Nasty” seed the other day and plan to scatter them in the garden soon. I do not have luck with seedlings for some reason. I think I over water them and they rot on me. And then there is the cat issue so I just scatter…
ReplyDeleteI recently sowed some nasturtiums as well and they're up and running (at least I hope so). Love your process. The plastic jug makes sense. LOL about your comment about your cats!
ReplyDeleteThe seeds arrived yesterday, Monica, and Beckie and I got together last night to go through them since I'm headed for AZ tomorrow. You should get them back next week. Happy planting!
ReplyDeleteHi, Monica;
ReplyDeleteLove nasturtiums! Now I'm inspired to squeeze a few more goodies onto the windowsills. I wonder if I could winter sow in my area...? May have to give that a try. :)
I adore Renee's seeds and the fact that she is such a giving gardener. She donates to many worthy causes.
ReplyDeleteHere is a gardening tip I learned directly from the nasturtiums in my garden. When they're up and thriving pick a bouquet of stems, not just flowers. They will usually form little rootlets within about 8 or 9 days and your bouquet can be transplanted outdoors.
All joys to you,
Sharon Lovejoy Writes from Sunflower House and a Little Green Island
I just ordered your book..if you can, would you sign mine. I love getting personalized books from the authors..maybe it will help me as I am clueless about gardening. ..Michelle
ReplyDeleteYup, you used to be at technical writer alright. I'm still one and wish I didn't have to be. it's an OK job to be sure but I'd rather be gardening :-D Great ideas you shared there, and I'll remember what to do given these clear instructions.
ReplyDeleteWonderful tips for getting Nasturtiums going I got to try it.
ReplyDeleteI didn't know there were climbing Nasturtiums"...The one's that I grew did spread and trail over the sides and would get a little tall, but not climb..Got to get some of those too".....
I found out about Renee's garden a couple of days ago by accident while trying to help blogger:
A Garden blog of a Girl Growing Southern...she had a question about a Nasturtium that she thought might be variegated.
When I placed the question in the search bar..Renee's Garden popped up..She sales several delightful looking Nasturtiums, glad I found her as well.
Monica,
ReplyDeletePlaying catchup with the posts from March. Just wanted to stop by and say thanks for starting early.
Don't forget about this Sunday's post. Can't wait to see your progress.
P.S I love that you labeled them "nasty.:
This comment has been removed by a blog administrator.
ReplyDeleteGreat tips!!! Thanks!
ReplyDelete